So you’ve decided after reading and watching the Plasma Fibroblast 101 content that you want to burn dots into your face:)

This video should help fill in the gaps and this will help fill in any gaps from the video. I find that these blog posts coupled with the video should provide a lot of information on how I do procedures DIY at home. PLEASE BE ADVISED……. I’m not trained, licensed or a professional in any procedure I share unless otherwise stated. Natural Kaos is my personal skincare journey that I share online. Nothing I say or write should be taken as medical advice. I’m not offering advice, I’m simply sharing what I do. Please do your own research and make the best decisions for yourself and your skin type. Further, most links in this post are affiliate links. Meaning I am compensated when you choose to purchase an item I’m using.
ITEMS YOU WILL NEED

I made a Plasma Fibroblast Subcategory on Amazon so you can easily see everything in 1 location, I will also list them out below and why and when I use them. The Plamon Plasma Pen and Professional Numbing Cream are not found on Amazon.


I take 4 of these Arnica tablets and dissolve them under my tongue to help with healing and inflammation.

I make myself a little DIY NORCO (2 Tylenol + 3 Ibuprofen) This is something my Dentist showed me when I was having all my teeth ground off. I lived on this cocktail for a month while that whole experience was underway and it helped greatly with pain management. Keep in mind this might not be safe for you, please use your own judgment and don’t just do this because I do.

You can use any small microneedling roller you choose. I like to do a lite microneedle roll before I put on numbing cream. This helps the numbing cream bypass the skin barrier faster and will help expedite numbing. Plasma pens hurt. They are literally burning your skin. You need to be numb for this otherwise you will not be able to endure 1000 burn dots.

You can put your numbing cream on with your fingers. I have many spa brushes so I use them, and they are nice to have on hand if you are getting into DIY skincare at home. These are not necessary.
NUMBING CREAM Save12% KAOS12

I love my strong numbing creams from Korea. I did a comparison video last year between 6 of them and I found Wellscaine Plus to be my favorite.

The Daiso is a must-have for at-home beauty practices. Its initial purpose is to lock down a sheet mask and help the essence absorb deeper into your skin. For plasma fibroblast, I like to use it as a seal to lock down the numbing cream and help it absorb deep into my skin.

The Plamon Plasma Pen is identical to the Plamere Plasma Pen version 1. I have both and have used both. I actually just did a comparison between them for a future video. You can get a Plamon on Sale. KAOS10 Saves an additional 10%

I prefer these bent copper needles to straight needles. The bend helps you position the pen better, especially around your eyes. These copper needles can be reused. They do struggle sometimes arcing.

This was the first time I used these steel needles. These are a lot more forgiving than the copper tips and less expensive. These do not last as long as copper needles. These seem to carry the current better and appear to arc more easily, no matter which angle you come at the skin. (The copper needles need to always be at a 90-degree angle to the skin in order to arc).

After doing my eyes DIY 4 times, I can assure you that you need a fan. The burned smoke will get into your eyes and you need them to see. Having a little fan running on the side of your face as you do your eyes helps keep the smoke from blurring your vision.
AFTERCARE
You only need 1 recovery spray. Below you will find the 2 I have and use. The goal during recovery is to first get the heat that accumulated in your skin to diminish. This usually takes 48 hours. During this 48 hr period, you do not take a hot shower, go in steam rooms, hot yoga, work out, etc. basically do not do anything that would add heat to your skin. During this period of time, you can mist your face with the following soothing sprays. You can do this when you feel discomfort. Don’t spray too often or you will delay the formation of scabs. After 48 hrs and once the heat is gone from your skin, the dots should have scabbed. If you do not have crusty scabs wait a bit longer. Once dots are scabbed use a greasy vaseline topical like Aquaphor. This will lock down your scabs and prevent them from drying too quickly and detaching from your skin. This is a critical time as you want these scabs to detach slowly to prevent any red marks. Active Repair Spray

This was my first aftercare spray for Plasma fibroblast treatments. I am still using it up which is the reason I alternated with both of my aftercare sprays.

Colloidal Silver is a newer aftercare product for me. This is a natural spray that helps prevent infection, is soothing, and helps with inflammation.
My preference is to wait 48 hours before adding SPF to my skin. If I have to go outside during the first 48 hours, I will use my UV Face Shield listed below. Once I can put Aquaphor on my face, then I use my Elta MD SPF.


I used a silk headband during this treatment. It’s helpful to make sure your hair is not in your face and if you are like me that means lots of hair tools to control those random flyaways.

This is an SPF 50 face shield. When your dots are first healing, it can be difficult to apply SPF. If you have to go outside during your first week make sure to have a UV shield that protects you from the sun. This is also helpful for after microneedling and TCA peels.
OMNILUX Save 10% KAOS10

I love this LED face mask and neck mask for healing my face and building collagen. I use this once my scabs are hard. No vaseline in between this mask and your skin. Your skin needs to be clean and dry. You should wait about 5-7 days following your treatment depending on your skin and how it is healing.
HEALING TIME
2 weeks after your plasma lift you will no longer have dot scabs and any redness should quickly fade, if not already gone. In fact, my eyes are completely healed by days 7-8 typically. In this demo video, I did my eyes as well as the lower area of my face and neck. This was my first time in these areas and the redness from after the scabs departed, did last longer than around my eyes, nearly 21 days for those areas to completely heal. I also found that body parts take longer to heal. My stomach and knees took over a month for the red dots to completely fade. Skin tightening and improvement will actually come over the next 12 weeks or 3 months. This is when the trauma from the burn actually builds collagen in your skin and helps boost firmness. Your skin tightening will not be visible until months out from this procedure.
PROCEDURE
FACE MAPS

Here is a picture of my face before I did this plasma lift procedure. I decided to include the lower areas of my face. Below are the maps we created.
LOWER FACE
Dots are scattered at a larger spacing than is typical because I was doing so many areas. If you choose to do multiple areas you will space more because one large area will take forever, and two you have to be careful not to compromise too much skin. Essentially if you burn too much skin you could have severe reactions because your skin is an organ and you can only compromise so much of it at one time.


The orange dots are outlining the area that will be addressed. The blue dots are the fill-in dots. The dots are spaced similarly to a 5 dice face.


SIDE FACE & NECK
This is a continuation of my lower side face and neck. You can see that I wrapped the dots from ear to ear. Then down my neck.

I used the orange dots to outline the lines I wanted to target. Then I filled in between them with the blue scattered dots. Once all the dots were complete I “sprayed” or zig-zagged across the indented wrinkle line.
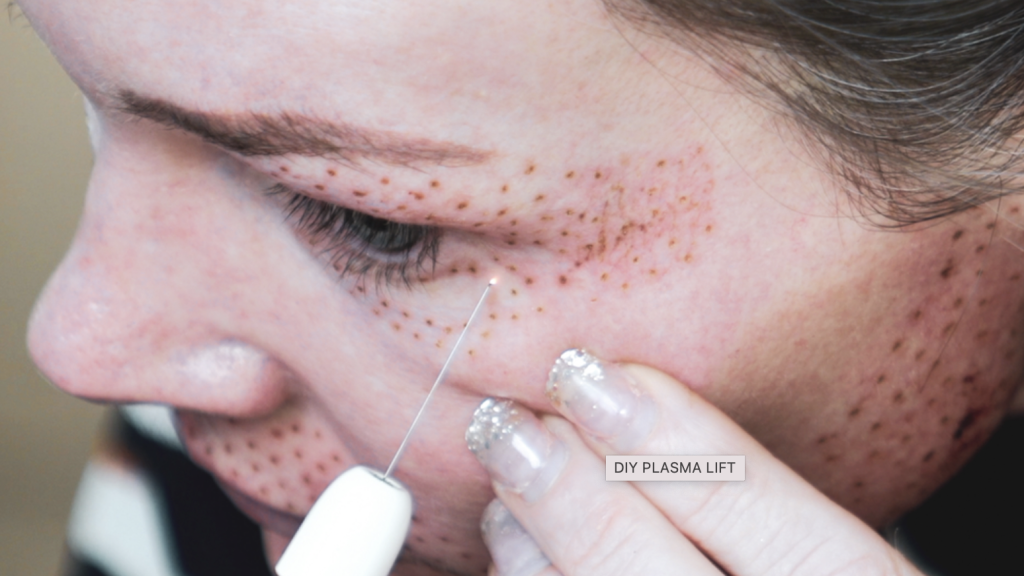
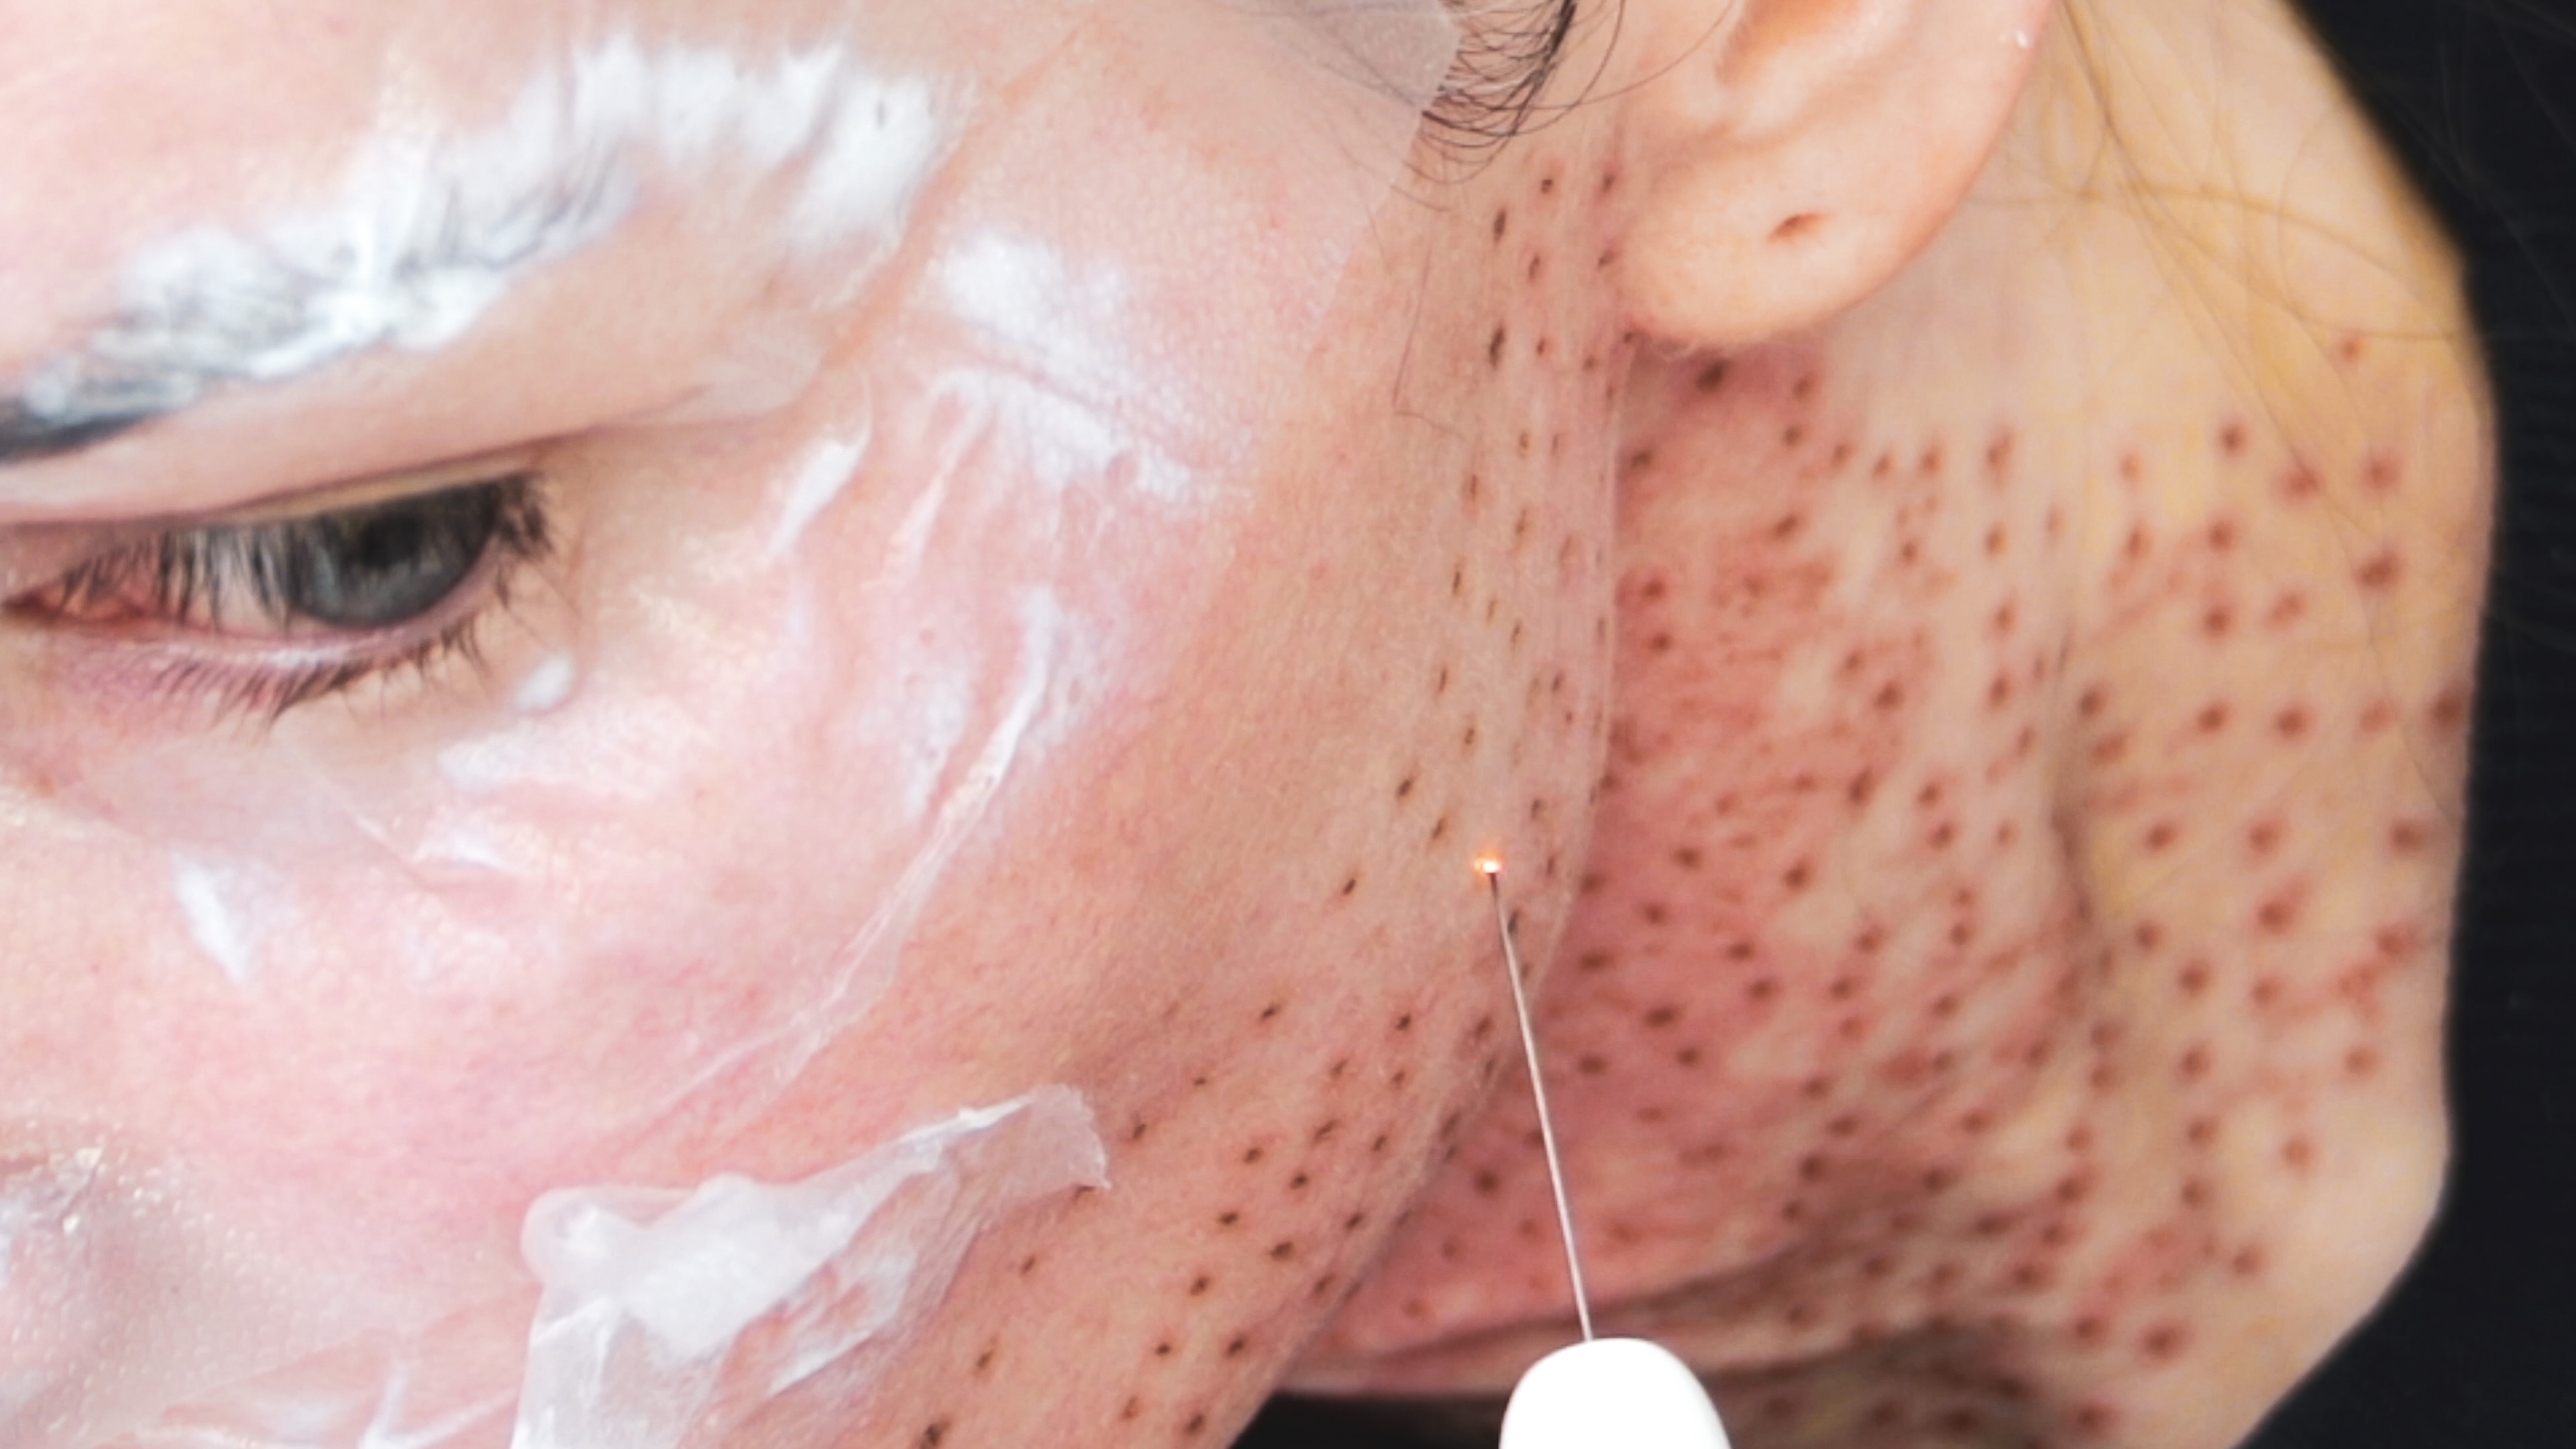
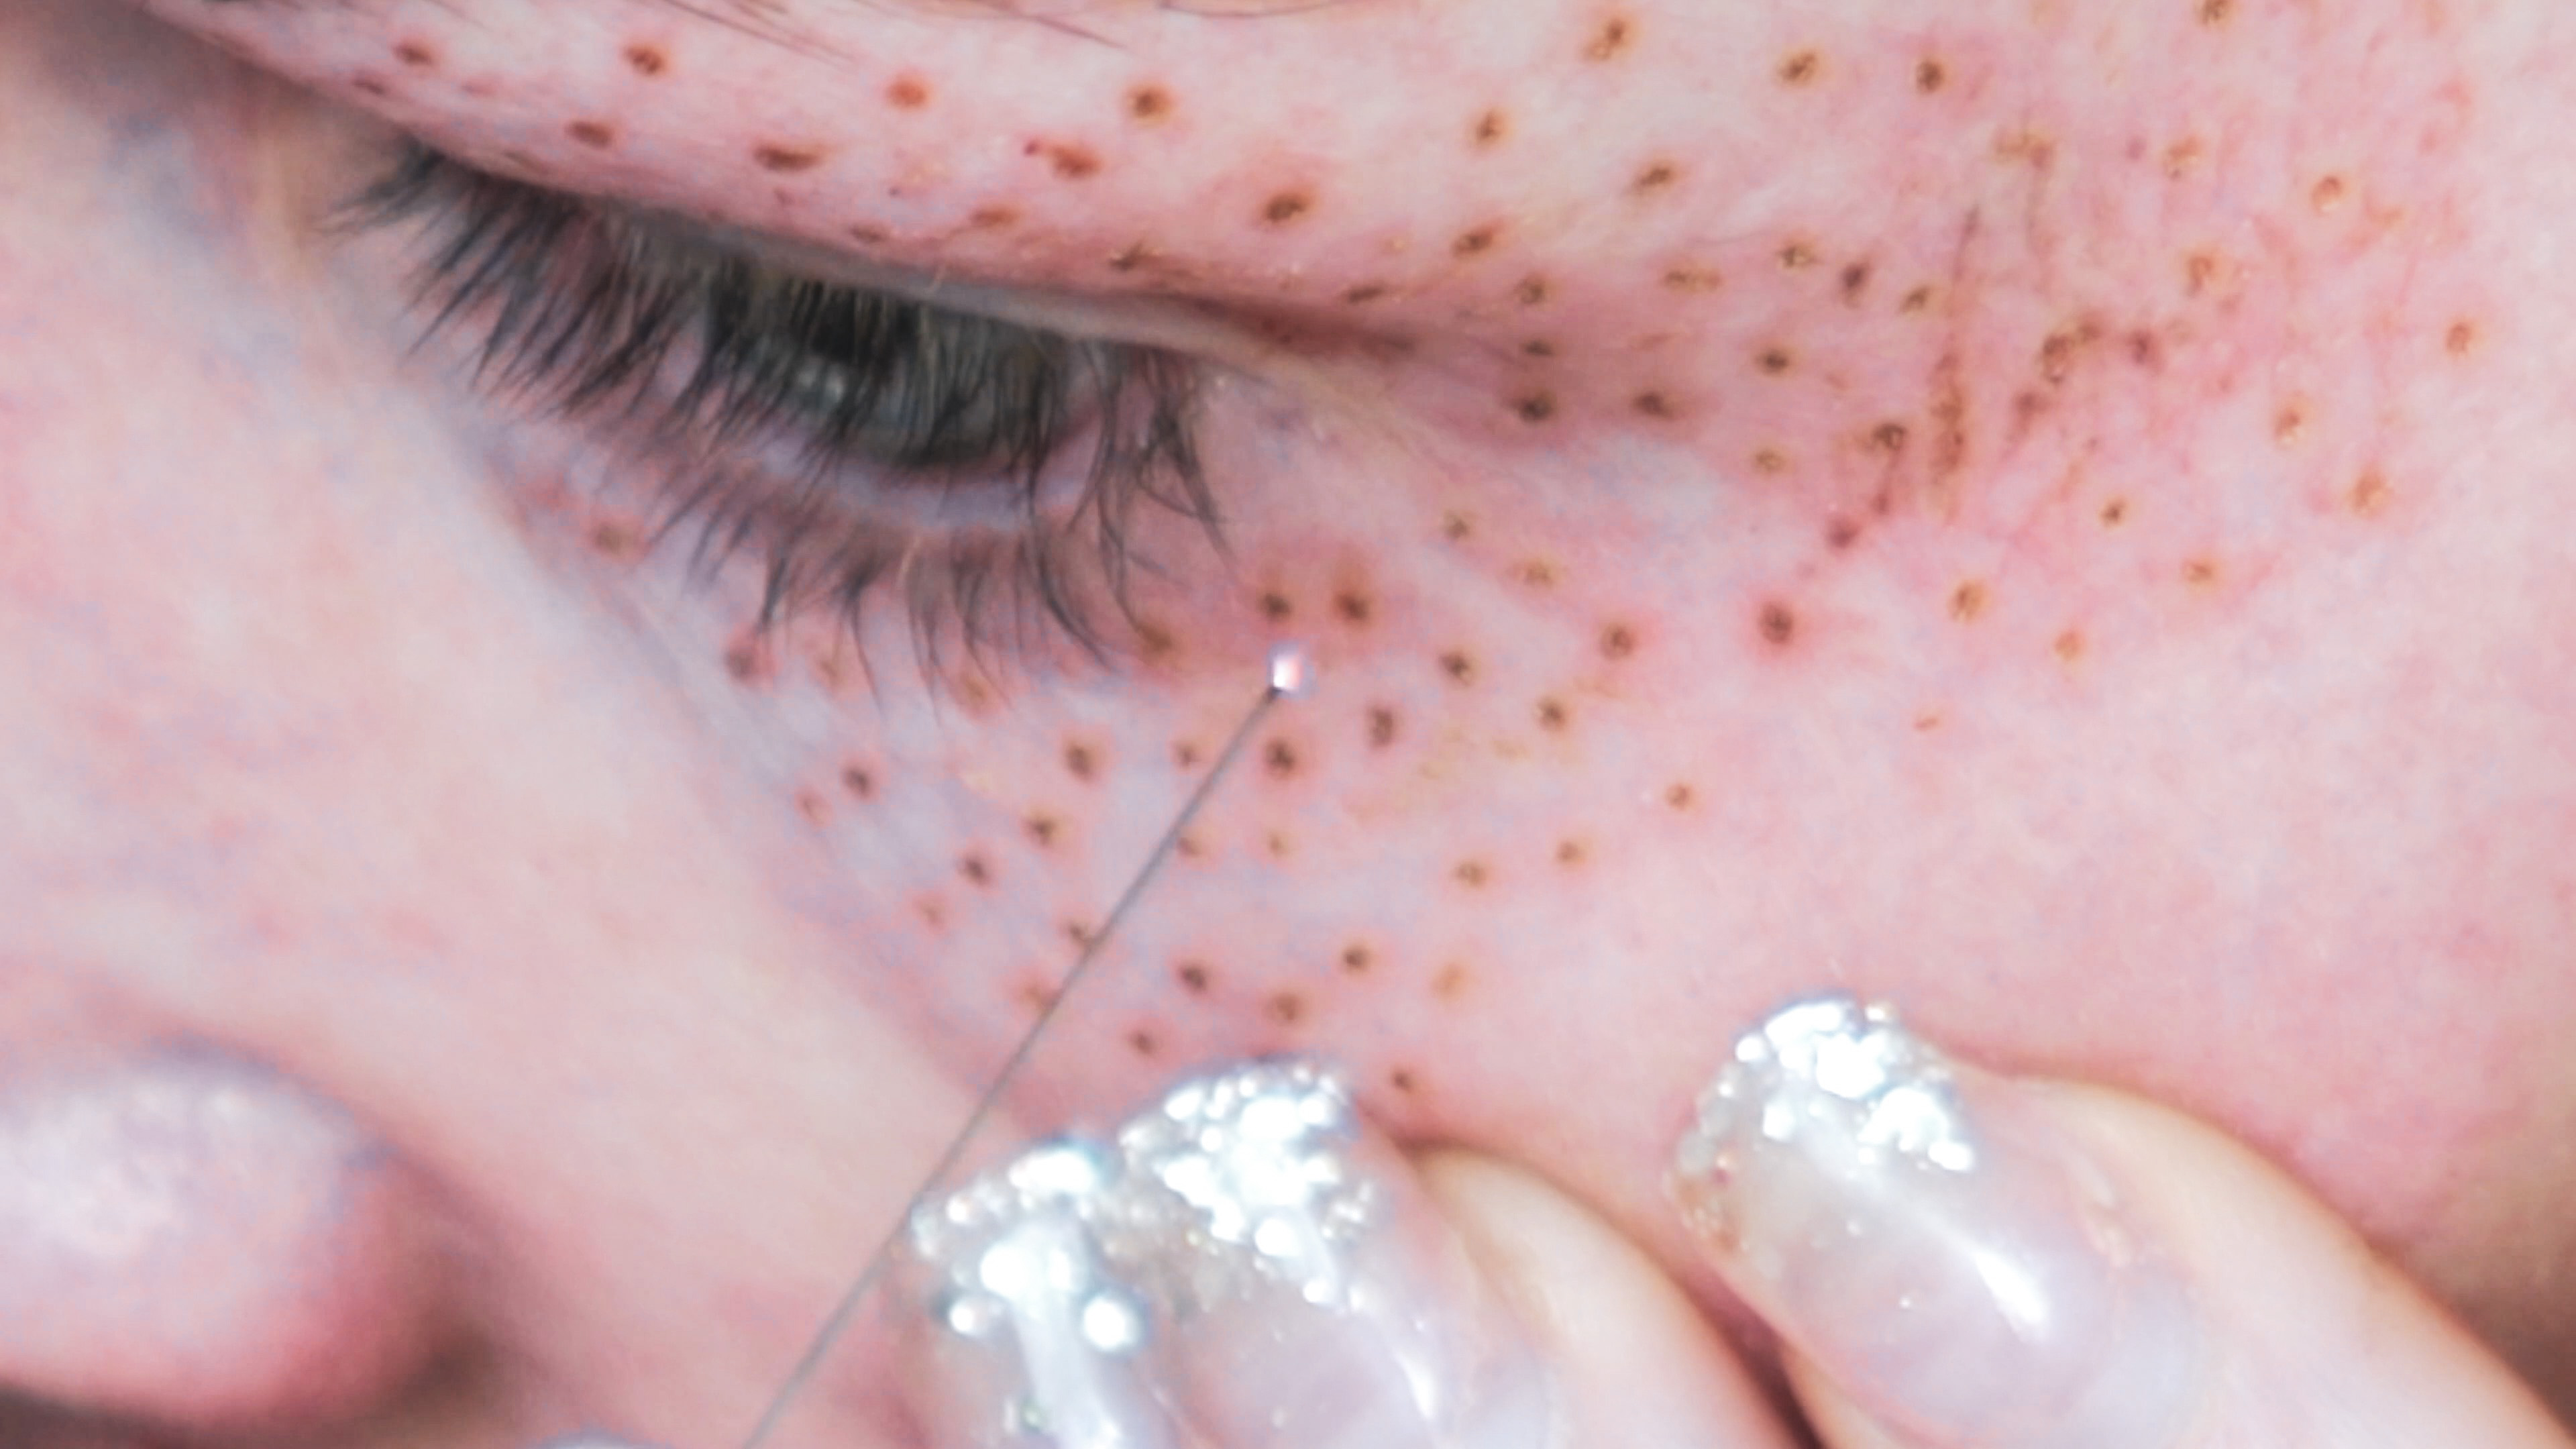
EYES
In the following pictures, you will see my eyes. I plasma fibroblasted above and below both of my eyes in the same session. Some may choose to break this up depending on how you swell. If you swell easily you do run the risk of your eyes swelling shut; not forever lol, but if you need to drive somewhere your sight could be impacted. I’ve done upper and lower the past 5 times (my first time in a studio with a trained professional and then 4 more times myself, so I am familiar with the amount of swelling I encounter).

Again you can see that the orange dots impart the area and the blue dots fill in. You make your outline first and then fill it in. Make sure to be 10mm from the inside eye corner. Make sure to numb all the way to your lash line otherwise you will not be able to tackle those bottom dots.

After the dots are all placed then, “spray” zig-zag across the whole area. This will increase the overall tightening.
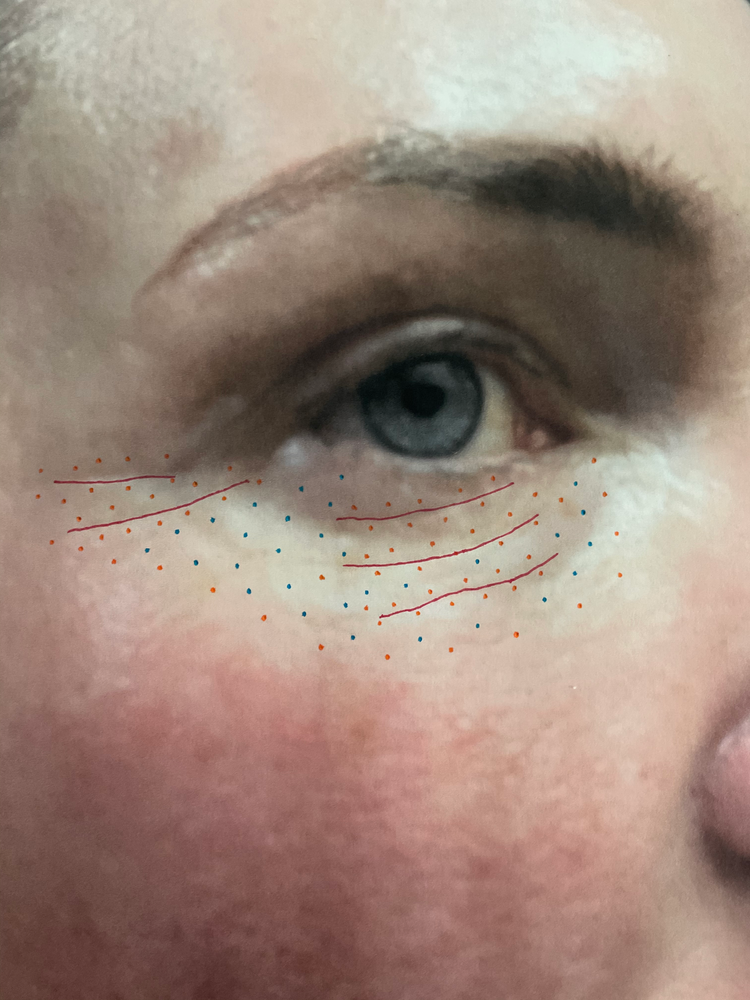
The red straight lines are my lower eye wrinkles. Orange dots first to outline and the blue dots to fill-in.

After dots are complete then “spray” zig-zag across the wrinkle lines.


I hope this blog and coordinating video are helpful. This is additional information on plasma fibroblasting.
Please leave comments below and we will try to respond. Have a lovely day and thank you for stopping by Kim xoxo
When you say the steel needles are a lot more forgiving, can you explain that more. I just used your code to get the Plamere! Thank you!!!!! And I’m gathering more and more information.
I have the two copper needles the device came with.
How do you know when to replace them? Will they just not arc?
I want to make sure I know when to replace them too.
sorry for rambling, I’m a Kindergarten teacher and I only had a few minutes 🙂
Hi Kim, do you have a mapping guide, and if so, where did you find it please? Thank you!
I think this blog IS the mapping guide. Take pics of each area of your face and map out where to treat.
This is the website I have been searching for these last 6 weeks!!! Got a high quality plasma pen but it came with practically ZERO instructions! Your thoroughness is a gift!
Great post! Seeing all the details written out, alongside precise product recs, was crucial in helping me through my first fibroblast session.
Brilliant information and so thorough. Thank you!!! I remember watching your channel when you did the procedure but I didn’t take any notes! I’m relieved I’ve found all the information I need right here on your blog.
Hi Kim
Where can i get a mapping guide please
Thank you for the maps. I was looking for a schedule but you’re the only one I’ve found 🙂
Thank you so much for putting this out there for us to see and get educated!! I can’t find hardly anything on how to do this. I’m worried I’ll put the needle on too long or go too far but with this website I’m sure it will help. Thank you!